
Development history of the Vari-Lift rocker system
Author: Alberto Keel, inventor and developer of the Vari-Lift rocker system and seller of the car
The first prototype rocker arm
January 2002: With a vision that I couldn’t share with anyone at first, I began drafting a patent application without any prior knowledge, submitted it on February 22 to the Swiss Federal Institute of Intellectual Property in Bern, and simultaneously designed and built a prototype of a rocker arm. The goal was to find out as quickly as possible whether my vision would actually work.
April 2002: The first prototype rocker arm was ready for testing.
The prototype rocker arm was equipped with two switch pins to increase functional reliability. Hardened drill bushings were inserted into the rocker arm as switch pin guides. The springs came from ballpoint pens. The eccentric was made from a piece of ductile iron that was sawn out of an old crankshaft.
Since I had a freshly built Pontiac 400 cui engine from another project lying around, I used it as a test setup. I built the prototype on this engine and placed it on a lathe, which drove the camshaft by means of a V-belt.
That was the actual birth of the rocker arm and the test setup, which I used to thoroughly test the prototype rocker arm (and later also the zero series) under a wide variety of conditions. The images were taken during the test phase.


Testing the prototype rocker arm
The rocker arm was tested for several hundred hours on the test rig. The stroke was switched every second, mostly at 1850 rpm camshaft revolutions (3700 engine revolutions).
To my amazement, the rocker arm worked right away and was completely reliable. The valve lift could even be switched at 2950 camshaft revolutions. It was really impressive and, of course, a unique sense of achievement for me.
At that very moment, it was clear to me that I had discovered and created something unique.
The video shows the valve lift changeover at very low speed.
April 2002 to Spring 2005
Once the prototype of the rocker arm was working, I asked myself the following question:
What now? How do I get into the automotive industry?
It quickly became clear to me that, as an unknown nobody without professional help, I would have little chance of successfully presenting this invention to the American automotive industry.
Due to the multitude of events between 2002 and 2005, I have decided to skip these and continue with topics relevant to development.
Why V-TEC rocker arms for Pontiac?
Spring 2005: After none of the big three showed any interest in the invention, I had one last hope: the production and distribution of a retrofittable variable rocker arm kit for the American V8 tuning sector, essentially V-TEC for Chevys, V-TEC for Fords, V-TEC for Pontiacs... The product had to fit exclusively on Edelbrock cylinder heads. My ulterior motive was to develop a V-TEC rocker arm set that fit Edelbrock heads, present it to Edelbrock, and strive for an exclusive collaboration with Edelbrock that would be beneficial to both sides.
If money had been no object, I would have developed the rocker arm system for the 350 cui Chevy engine. However, there were two good reasons not to do so. The first reason was that Chevy would require four different rocker arm designs. The picture on the right shows that four different designs are needed for this engine, namely left rocker arms with a small offset, left rocker arms with a large offset, right rocker arms with a small offset, and right rocker arms with a large offset. This would not have been financially viable for me, as small-batch production using investment casting would have been very expensive anyway.
Since I already owned a complete Pontiac engine with Edelbrock heads, it was clear that I would adapt the rocker arm system to this Pontiac engine for the time being. If it turned out that the rocker arm system could actually be marketed successfully, there would be nothing to prevent me from developing further rocker arm sets, e.g. for Chevy, Ford, and other engines.

Motown head SB Chevy
Motown head SB Chevy
Strength specifications and new design for investment casting
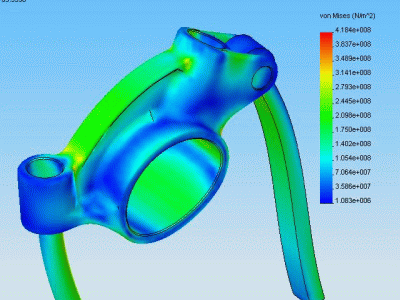
Before I could start developing and designing the new rocker arm, I needed reference values for the required load capacity and strength. So I measured one of the best-known aftermarket rocker arms and modeled it to scale in CAD. I was familiar with the material used.
Now I could begin my investigations using the structural analysis program. I clamped the virtual “software rocker arm” and applied a reference load of 10,000 newtons. This revealed the stresses occurring and their distribution in the rocker arm. In this way, I obtained the required reference values, which I used to develop the new rocker arm.
My goal was now to design a new rocker arm made of SAE 8620 steel, which was to be manufactured using the investment casting process, which should have at least the same strength, and which should not be heavier or more sluggish than the reference rocker arm. Since the use of the investment casting process allows a high degree of design freedom, I was confident that I would be able to achieve this goal.
After determining the key data for the rocker arm (center distances, angles, etc.), I began designing/drawing the rocker arm. The focus was always on the optimal structure (stress distribution when the component is loaded), the weight, and the position of the center of gravity. The visual design was deliberately ignored. The newly designed rocker arm was repeatedly loaded with the reference value (10,000 newtons) and compared with the reference rocker arm. Many different shapes with different ribs and reinforcements were initially drawn and structurally examined. Step by step, a little was optimized here, a little was removed there, a little was added here...
The result after several hundred hours of CAD work was motivating, both structurally and visually.
Fall 2005: according to the computer simulations and calculations, the goal had been achieved. Although it was clear that the structural analysis on the computer was merely a guideline that could in no way replace further testing, I took the plunge and ordered a “zero series” of 50 rocker arms from our supplier.

Spring 2006: The V-TEC rocker for Pontiac Rev. 00
The following images show the first series of rocker arms, which were used for testing and development (batch size of 160 units).


"Die Hard"...The Wöhler Curve
While the pilot series went into production, I thought about how the rocker arms should be tested after delivery. So I developed the device shown here, which is quite something... because no rocker arm will survive testing on this apparatus.
The test device is basically constructed in exactly the same way as a normal valve train in a pushrod engine. The difference is the strong “valve spring,” which can be continuously adjusted from 0 to 10,000 newtons. The “valve lift” is also greatly reduced and limited to approx. 1.5 mm so that the device can be operated quietly. This device is clamped onto a lathe and driven by it. The rocker arm hangs upside down in an oil pan to ensure lubrication.
This device is used to determine the Wöhler curve. The rocker arm is loaded with a preset force (adjustable “valve spring”) and then unloaded again until it breaks. The number of load cycles until breakage is counted and entered into a diagram.Initially, a high load is applied. The number of load cycles until failure is low at the beginning. The load is then reduced step by step. The number of load cycles increases as the load is reduced. Once the load has been reduced to the point where 10 million load cycles (applies to steel) are reached, experience shows that the component will no longer break, i.e., the ultimate load capacity for fatigue strength has been determined. The following video sequence shows the test device in operation...


First, the reference rocker arm was clamped into the test fixture.
Due to the high load setting, I assumed that it would break after a few hours. However, it turned out that the weak point of the rocker arm was not the rocker arm body, but the Torrington needle bearings. I was a little disappointed with this test result because I actually wanted to force the rocker arm to break.
Nevertheless, I now had a useful reference value that could be used as a comparison value. After all, it is irrelevant whether the rocker arm breaks first or the needle bearings fail first... broken is broken.
After the new zero-series rocker arms arrived, a large number of them were destroyed on the test rig.
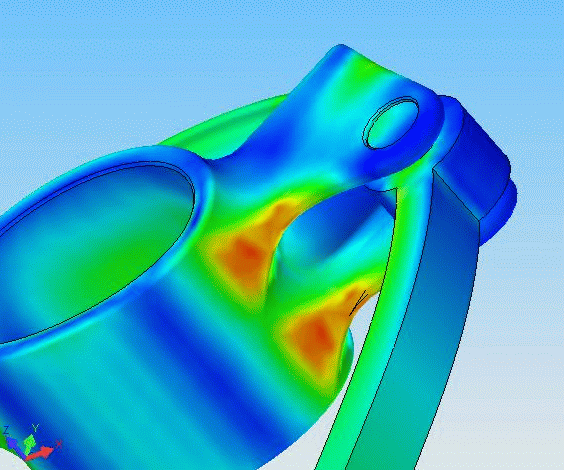
The video sequence shows a test run with a first-series rocker arm. The test rig was operated at 600 rpm, which corresponds to 10 load cycles per second.
A large number of the first series rockers were destroyed on the test rig. It turned out that the rocker arms all broke at exactly the point where the structural analysis software had previously calculated the stress peaks. The switching mechanism remained intact on all rocker arms tested, i.e., this was never the weak point of a rocker arm. The tests also showed that the fatigue strength of the V-TEC rocker arm was on par with that of the reference rocker arm. I could now say with certainty that this new rocker arm met my expectations in terms of load capacity.


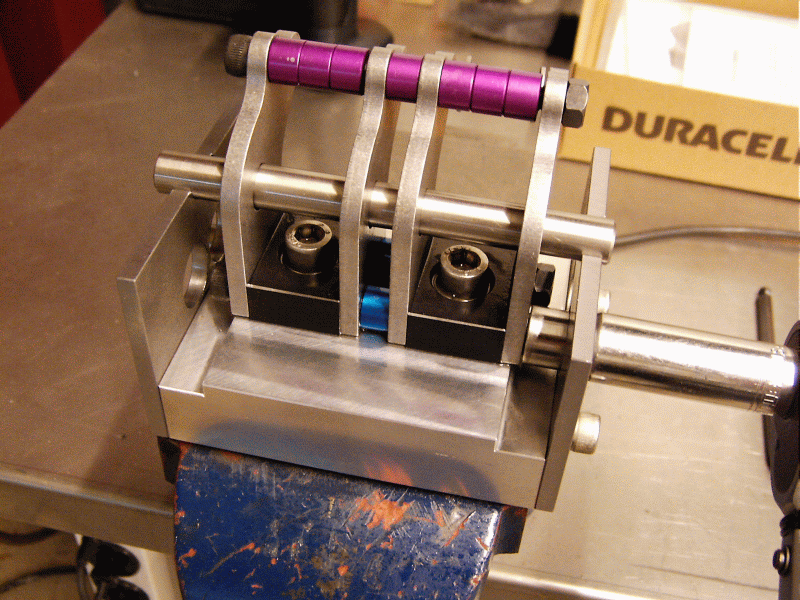
Various mounting tools and testing devices
To ensure precise assembly of the rocker arms and supports, various gauges and testing devices had to be manufactured.
Assembly Tool for the supports

Torquing the screw after correct alignment
Torquing the screw after correct alignment
Torquing the screw after correct alignment
Pressfit of the roller pin

Testing structure

Preload test of the roller pin

Test failed / Rejected part
Testing structure
Springcap calibration tool

Sturcture

Calibration process

calibration mandrels
Sturcture
Bending tool for alignment sheet

Bending the stopps

alignment sheet

function view
Bending the stopps
Assembly according to selection process
Fall 2006: One of the most important points when assembling the rocker arms was to keep the running clearances as small as possible, especially between the eccentric in the rocker arm body, the eccentric bore and the main shaft, and between the mode pin and the mode pin guide. Small running clearances mean low leakage losses and thus less loss of oil pressure in the engine. Especially when the oil is hot and the engine is running at idle speed (e.g., 600 rpm), the engine oil pressure must not fall below a minimum value. Otherwise, the rocker arm system would switch to high-lift mode, which would be the wrong operating mode for idle speed.
For this reason, each individual rocker arm was selected and assembled in a selection process. This means that each eccentric, each shift pin, each rocker arm body, and each rocker arm shaft was measured and sorted according to the measured values.


Optimization of the switching process
Many attempts with different modepin springs, modepin dampers, and modepin stops were necessary.
An important finding from the tests was that the use of a quick exhaust valve per cylinder bank significantly improved the switching (see below for a description of the valve). With the use of these valves, it was ultimately possible to perform the switchover without any problems on a fully equipped engine, even at an unrealistic speed close to 6000 rpm.


Quick vent valve (required for a save operation and for quick shift of the operation mode)
The quick vent valve has two very important functions.
It ensures that the rocker arm system cannot be operated continuously in an oil pressure range where the rocker arm does not know exactly whether it should switch over or not.
The rocker arm system should either be operated at over 1 bar in low-lift mode (modepin completely disengaged) or at a maximum of 0.3 bar in high-lift mode (modepin fully engaged). Pressures between these two values should be as short as possible and only occur during the switching process.
The quick vent valve ensures also that the switching process is completed as quickly as possible. If the system were operated without this quick vent valve, the mode pins would only move slowly toward the eccentric, just as the sum of all leakage losses across all gap dimensions would allow.


Reworking solenoid valves
In the long-term test (engine fully equipped with 16 rocker arms on the test rig), the rocker arms should achieve 170,000 switching operations at 3500 rpm without incident, which corresponds to a test duration of around 48 hours at 1 switching operation per second.
During the first test run, the solenoid valve failed after approximately 6 hours. I replaced the valve and restarted the test. After 6 hours, the error repeated itself.
When I disassembled the solenoid valve again, I noticed that the magnetic field around the armature was drawing fine ferromagnetic metal abrasion particles from the engine oil into the armature chamber of the solenoid valve. This was particularly the case in low-lift mode operation, when the solenoid valve is permanently switched. The abrasion deposited on the armature, which is made of iron and remains slightly magnetized for its entire life from the very first switch.
The abrasion in the armature chamber came from wear on the camshaft, from the oil pump and from the Gear distributor grardrive. One might think that this small amount of abrasion is negligible or would be filtered out by the oil filter. This is not the case. Even a 10-micron oil filter cannot filter this fine abrasion (<1 micron) out of the oil. Just 0.1 mg (milligrams!) of finely ground cast iron in the armature chamber of the solenoid valve is enough to block the armature in the solenoid valve.
The solution was to separate the armature chamber from the oil (media-separated solenoid valve). This was achieved by reworking the valve and inserting an O-ring. After that, the problem never occurred again.
Another rework was to incorporate a small bypass hole in the valve body, which ensures lubrication of the rocker arm system in high-lift mode


Long-term test: Testing the switchover
The quick vent valve has two very important functions.
It ensures that the rocker arm system cannot be operated continuously in an oil pressure range where the rocker arm does not know exactly whether it should switch over or not.
The rocker arm system should either be operated at over 1 bar in low-lift mode (modepin completely disengaged) or at a maximum of 0.3 bar in high-lift mode (modepin fully engaged). Pressures between these two values should be as short as possible and only occur during the switching process.
The quick vent valve ensures also that the switching process is completed as quickly as possible. If the system were operated without this quick vent valve, the mode pins would only move slowly toward the eccentric, just as the sum of all leakage losses across all gap dimensions would allow.
V-TEC rocker for Pontiac Rev. 01... the final design
Following successful testing of the first rocker arm series, manufacturing defects were corrected and improvements were made to the design. The main differences between Rev. 00 and Rev. 01 are explained in the following images.


old
new
old
old
new
new
Ready for Take-off

After the second series had been checked, sorted, assembled, and thoroughly tested, I put together rocker arm sets ready for shipping. Each rocker arm set had to prove itself on the test rig for 1 hour. Only then was it dismantled and packed.
The set contained everything needed for assembly. Hoses, fittings clamps, solenoid valve with mounting bracket, temperature switch, electrical components, speed switch, relay, tools, and manual—everything was included. It even came with a test report bearing my signature.
Parallel to developing the rocker arm system, I created a website describing the Vari-Lift rocker system. At that time, there was no WiX, Jimdo, or IONOS. Without knowledge of html, x-html, cascading style sheets and javascript, it was not possible to create a website. I couldn't afford to hire a web designer. So for me, it was a case of learning, and then doing it myself.
Spring 2007: I was now ready to go with the Vari-Lift rocker arm system.


"It is the typical fate of many inventors to have to give up their dream and come back down to earth."
Spring 2007: Collaboration request with Edelbrock
I sent a set of Vari-Lift rockers to Edelbrock in the hope that this product would spark their interest. Edelbrock also confirmed receipt of the rocker arm set. A few days later, I was contacted by the head of the development department. He told me that they were very impressed with both the invention and the build quality of the rocker arm set. Unfortunately, the product would not fit into Edelbrock's product line.
Spring 2007: Publication request in Hot Rod Magazine
I contacted Rob Kinnan from Hot Rod magazine and told him about the Vari-Lift rocker system. Mr. Kinnan told me that he was very interested and would like to test the rocker arm set so that he could then publish a report on this invention in Hot Rod Magazine. So I sent him a rocker arm set.
Then time passed without any news from Hot Rod Magazine. Mr. Kinnan told me several times that they had not yet found anyone with a suitable engine.
So I contacted David Butler from Butler, told him about the invention, and asked him if he would be willing to install the rocker arm system on a Butler engine and test it in the presence of Hot Rod Magazine. David Butler also expressed interest.
So I sent Butler a set as well and informed Mr. Kinnan from Hot Rod Magazine that the tests could be carried out at Butler.
I have not received any response from Mr. Kinnan since then.
David Butler confirmed receipt of the rocker arm set and told me that they would assemble and test it as soon as they had a suitable engine ready. Then time passed and nothing happened at Butler either. Every time I inquired, I was told that they did not yet have a suitable engine available.
At some point, I became suspicious. I offered to buy a complete engine from Butler. I would also pay for two employees to perform two days of test bench work. I asked him to provide me with a quote for a new engine and two days of test bench work with two employees. I received neither a quote nor a response from Butler.
Note: All rocker arm sets that were shipped were returned to me.
Spring 2007: Selling on eBay
In spring 2007, the Vari-Lift rocker arm kit was first offered for sale on eBay USA at a price of $2,200 per kit.
The product was torn apart in the relevant forums.
Not a single kit was sold.
October 2007: The end of the dream:
With no prospect of success, by fall 2007 all resources had been exhausted, both the financial means and the will and strength to continue the project. I gave up my self-employment and took a job as a plant engineer for pharmaceutical packaging systems in November 2007.